Hi everybody,
I have been away from blogosphere for a short while (a period of almost 9 months ...!!). I don't know how I could stay away from the CADD world for such a long time. It was really painful not getting updated with the latest CADD info, but at the same time had a very sweet and memorable time spent with my family back home. Now feel pretty happy to be back in the role of a CAD Admin, a job I had been longing for a long time.
Two weeks ago, one of my friends emailed me seeking an easier way to plot with previous page setup without opening the plot dialog. I was lucky to have successfully tried the following macro in AutoCAD 2005 and AutoCAD 2008 versions.
^C^C-Plot;No;;Previous Plot;;No;No;Yes
The most important aspect of this macro is to provide 'Previous Plot' at the page setup name prompt. Keep the macro inside a button or menu. Or else, you can easily convert this macro to create a lisp routine and assign a shortcut for that as shown below.
(defun c:PP()(Command "-Plot" "No" "" "Previous Plot" "" "No" "No" "Yes"))
Saturday, July 19, 2008
Monday, October 15, 2007
How to Overcome the FIND Command Limitations
We know very well that the FIND command is doing a pretty good service by helping us to find various types of text objects inside the drawing such as single line text, multiline text, block attribute values, table text, dimension annotation text and hyperlink text. It will be too much to ask for, if we wish to add something else in the list. Here is a tricky way to find the other categories of text such as block attribute definition, RText etc. which can not be located using the FIND command.
Open the Quick Select dialog box using the QSELECT command. Select the 'Attribute' entry in the Object type drop down list. Next, select the 'Tag' entry inside the properties list. Now choose the appropriate operator and provide the attribute tag name in the 'Value' Text box. The specific attibute definition will be selected on clicking OK button. Type ZOOM (normal shortcut - z) and Object (Normal Shortcut - o) to zoom to the selected attribute definition.
Use the same procedure with Object type 'RText' and Property 'Contents' to locate an RText object.
Tuesday, October 9, 2007
Using Additional Options Inside Standard AutoCAD Commands
Are we going to edit the standard AutoCAD commands? No way. Rather we will look how to achieve a similar functionality in a tricky way. We are going to make use of AutoLISP's special ability to work transparently in between commands. Let us see how to utilise this to draw a circle with circumference option.
Add the following lisp routine to your acadDoc.lsp file. If the acaddoc.lsp file does not exist, create a new one.
(defun c:C#() (/ (getreal "\nEnter circumference : ") (* 2 pi)))
Now we can use this circumference option inside the circle command in the following way.
Command: Circle
Specify center point for circle or [3P/2P/Ttr (tan tan radius)]: Pick center point
Specify radius of circle or [Diameter] <5.5>: 'C#
Enter circumference : 100
15.9155
Don't forget to provide the option as transparent using apostrophe ('). It will draw a circle with given circumference. Note that you can use any convenient option name in place of C#. I used the special character '#' in order to distinguish it from the standard command shortcuts. Here goes another sample for creating a circle with 'Area' option. Follow the same procedure you did for the previous option.
(defun c:A#() (sqrt (/ (getreal "\nEnter circle area : ") pi)))
And use it in this way
Command: Circle
Specify center point for circle or [3P/2P/Ttr (tan tan radius)]: Pick center point
Specify radius of circle or [Diameter] <6.8>: 'A#
Enter area : 500
12.6157
If you come up with any other options, feel free to share it here.
Sunday, October 7, 2007
Quick Tip - Move Text Inside Edit Attributes Dialog
This tip is some what similar to the Move Text Inside Edit Text Dialog tip posted earlier. Here you can drag selected text from one textbox to other using the cursor. Again, I have used two images to simplify the explanation.
The image before moving the text
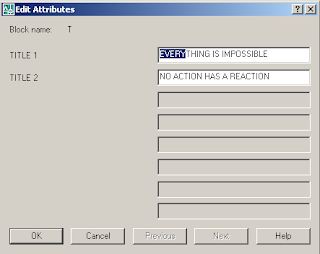
And this is what I achieved using the cursor
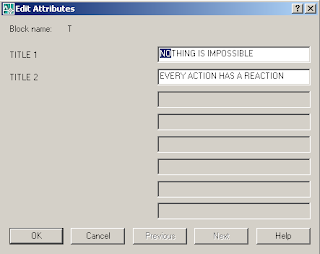
The image before moving the text

And this is what I achieved using the cursor

Tuesday, October 2, 2007
Renaming an Active Drawing from the Command Prompt
Is it really possible to rename an opened file? Normally the operating system will not allow you to do that. But it is REALLY possible to do it inside AutoCAD by adapting a tricky way as explained below. Here are the steps involved in the process.
- Get the new drawing name from the user
- Check any drawing is existing in the current folder with the name provided.
- If not, save and close the current drawing and copy it in the new drawing name.
- After verification, delete the old file.
- Open the copied file in AutoCAD
Though it seems like a long procedure, practically it all finish within a moment. The user never get the feeling of all those background processing. Users are encouraged to set system variable ISAVEBAK to 1 in order to eliminate the chances of possible data loss due to any unexpected errors. The following is an implimentation of above logic in AutoCAD VBA
'*****************************************************************
'<--  Active Drawing Renaming Utility                        -->
'<--  Renames the current drawing from the command prompt.   -->
'<--  By Mohamed Haris (zoomharis@gmail.com)                 -->
'*****************************************************************
Sub RenameOnline()
On Error GoTo ErrDet
Dim objFS, objFL As Object
Dim strFilePath As String, strNewFileName As String, strNewFileFullName As String
Set objFS = CreateObject("Scripting.FileSystemObject")
Set objFL = objFS.getfile(ThisDrawing.FullName)
strFilePath = ThisDrawing.Path
strNewFileName = ThisDrawing.Utility.GetString(True, vbCr & "Enter new file name to rename: ")
strNewFileFullName = strFilePath & "\" & strNewFileName & ".dwg"
'*** Check for a valid windows filename
If Not FileNameIsValid(strNewFileName) Then
    MsgBox "Please provide a valid name to rename....", vbExclamation
    GoTo ClearMem
ElseIf objFS.fileExists(strNewFileFullName) Then
    MsgBox "A file with new filename already exists...!!!" & vbCrLf & _
    "Please check the existing filenames...", vbExclamation
    GoTo ClearMem
Else
    ThisDrawing.Save
    objFL.Copy (strNewFileFullName), False
End If
'*** Make sure that the file has been copied before deleting the old one
If objFS.fileExists(strNewFileFullName) Then
    ThisDrawing.Close True
    objFL.Delete
    Application.Documents.Open strNewFileFullName
Else
    MsgBox "Couldn't rename the file. Please try again...!!!", vbExclamation
End If
ErrDet:
If Err.Number <> 0 Then
    MsgBox "An error occured while renaming the file....!!!" & vbCrLf & vbCrLf & _
    "Error Description: " & vbCrLf & Err.Description, vbExclamation
End If
ClearMem:
Set objFL = Nothing
Set objFS = Nothing
End Sub


'*** NOTE: A regular expression could serve better for this purpose
Function FileNameIsValid(ByVal strFileName As String) As Boolean
Dim i As Integer
If Trim(strFileName) = "" Then
    FileNameIsValid = False
    Exit Function
End If
arInvalidChars = Array("\", "/", ":", "*", "?", """", "<", ">", "")
For i = 0 To UBound(arInvalidChars) - 1
    If InStr(1, strFileName, arInvalidChars(i), vbTextCompare) <> 0 Then
        FileNameIsValid = False
        Exit Function
    End If
Next
FileNameIsValid = True
End Function
Normally I don't provide the new file name in the command prompt. Instead, there is another VBA routine which takes the the drawing name attribute value from the title blocks and provide it as the input for the RenameOnline utitlity. You could also implement this logic in any of your favourite programming languages.
Sunday, September 30, 2007
System Variables I Cannot Live Without - The Top Ten List
System variables have been one of the most important aspects of AutoCAD throughout its history.I wonder how complicated the life would have been without these tiny little masters. Here goes a few of them I cannot live without.
- FILEDIA - Suppresses display of the file dialog boxes. This is the culprit behind one of the most commonly asked questions by the newcomers about missing file dialog box.
- MIRRTEXT - Controls how the MIRROR command reflects text.Ignorance of this system variable may double your work at times.
- PICKFIRST - Controls whether you select objects before (noun-verb selection) or after you issue a command.For the beginners, I would suggest to keep the noun-verb selection off until they become familiar with the normal selection methods.
- LTSCALE - Sets the global linetype scale factor.It's required to be setup as per the drawing scale with each new drawing to get proper linetype display.
- DIMSCALE - Sets the overall scale factor applied to dimensioning variables that specify sizes, distances, or offsets.As in the case of LTSCALE variable, this is also required to be setup properly at the beginning of each new drawing to get proper dimension display.
- SNAPANG - Sets the snap and grid rotation angle for the current viewport relative to the current UCS.I often use this variable to draw something at a certain angle.
- EDGEMODE - Controls how the TRIM and EXTEND commands determine cutting and boundary edges.A must know variable for neat TRIM and EXTEND operations.
- ATTREQ - Determines whether the INSERT command uses default attribute settings during insertion of blocks.Setting it to 0 will avoid attribute prompts at the time of block insertion.
- MODEMACRO - Displays a text string on the status line, such as the name of the current drawing, time/date stamp, or special modes.Very interesting and powerful when DIESEL expressions are used inside.
- USERIx/Rx/Sx - Used for storage and retrieval of user-defined integer/real/string values. Very handy variables to store values for macro operations.
- ISAVEBAK
- DBLCLKEDIT
- FIELDEVAL
- DWGNAME
- DWGPREFIX
- CLAYER
- SDI
- HPGAPTOL
- MTEXTED
- REMEMBERFOLDERS
- STARTUP
- VTENABLE
- INSUNITS
- CTAB
- ZOOMFACTOR
Wednesday, September 26, 2007
Perform Loop Operations in AutoCAD LT using DIESEL
It's well known fact that you can not perform loop operations using DIESEL as you do in AutoLISP or other powerful programming languages. Isn't it really frustrating to have given up so many interesting tasks due to the absence of loop structures inside DIESEL? Let's give a try to stretch the LT limits a little bit and see how to mimic the loop operations using DIESEL.
The following macro illustrates how to use DIESEL to perfrom a loop operation. This macro calculates the factorial of a given number by iterating a required number of times. You can use the same logic to create various loop structures as per your requirement.
*^C^C$M=$(if,$(<=,$(getvar,USERI2),$(getvar,USERI1)),setvar;USERI3;$M=$(if,$(=,$(getvar,USERI2),1),1,$(*,$(getvar,USERI2),$(getvar,USERI3)));setvar;USERI2;$(+,$(getvar,USERI2),1),_modemacro;"The factorial of "$(getvar,USERI1)" is "$(getvar,USERI3);^C)
Before using the above macro, you need to run a simple macro to set up the user variables and the status bar. You need to supply the required number at the USERI1 prompt.
^C^C_modemacro;.;setvar;useri1;\;setvar;useri2;1;setvar;useri3;0;
Isn't it quite simple to do an iteration using DIESEL? Basically a loop macro has the following componetns.
- *^C^C in the beginning to have continuous operations
- A conditional statement using a counter variable to continuously check against the loop upper limit.
- If the condition is not met, do the required operations and continue.
- If the condition is met, then terminate the macro using ^C at the end.
Subscribe to:
Comments (Atom)

