Sub Lvl2Lyr()
'## Translates Microstation levels to AutoCAD Layers
'## Based on AutoCAD 2008 and Microstation V8.0
'## Include reference to 'Bentley Microstation DGN 8.0 Object Library'
'## By Mohamed Haris (zoomharis@gmail.com)
'## ------------------------------------------------------------------
On Error Resume Next
Dim oMS As New MicroStationDGN.Application
Dim oMSdf As DesignFile
Dim oMSlvls As Levels
Dim oMSlvl As Level
Dim oMSct As ColorTable
Dim lngMScol As Long
Dim oCol As New AcadAcCmColor
Dim sLType As String
Dim oLyr As AcadLayer
Dim red As Byte, green As Byte, blue As Byte
Dim eDwgLWs As Variant
ThisDrawing.Utility.Prompt vbCrLf & _
                           "Importing layer settings from Microstation....."
'## C:\Test.dgn is the sample file used
Set oMSdf = oMS.OpenDesignFile("C:\Test.dgn")
'## Get the color table from the DGN file
Set oMSct = oMSdf.ExtractColorTable
Set oMSlvls = oMSdf.Levels
'## Iterate through each level to grab the properties
For Each oMSlvl In oMSlvls
    '## Prefix MS_ with each layer name to make out the imported layers
    Set oLyr = ThisDrawing.Layers.Add("MS_" & oMSlvl.Name)
    '## Remove the brackets from the linetype name before used in Acad
    sLType = Trim(Replace(Replace(oMSlvl.ElementLineStyle.Name, _
                  "(", "", , , vbTextCompare), ")", "", , , vbTextCompare))
    '## Hope the linetypes are available in Acad
    ThisDrawing.Linetypes.Load sLType, "acad.lin"
    '## Set linetype for the layer
    oLyr.Linetype = sLType
    '## Don't know a better way to convert DGN colors to DWG colors
    '## Grabbed RGB from DGN and applied it in the DWG
    lngMScol = oMSct.GetColorAtIndex(oMSlvl.ElementColor)
    red = lngMScol Mod &H100
    lngMScol = lngMScol \ &H100
    green = lngMScol Mod &H100
    lngMScol = lngMScol \ &H100
    blue = lngMScol Mod &H100
    oCol.SetRGB red, green, blue
    '## Set layer color
    oLyr.TrueColor = oCol
    '## Is layer isolated?
    oLyr.LayerOn = oMSlvl.IsDisplayed
    '## Is layer frozen?
    oLyr.Freeze = oMSlvl.IsFrozen
    '## Is layer locked?
    oLyr.Lock = oMSlvl.IsLocked
    '## Is layer Plottable?
    oLyr.Plottable = oMSlvl.Plot
    '## Layer description
    oLyr.Description = oMSlvl.Description
    '## Convert lineweights
    '## Define a enum array with respect to DGN lineweights from 0 to 31
    eDwgLWs = Array(acLnWt000, acLnWt013, acLnWt030, acLnWt040, acLnWt053, _
                    acLnWt070, acLnWt080, acLnWt100, acLnWt106, acLnWt120, _
                    acLnWt140, acLnWt158, acLnWt158, acLnWt158, acLnWt200, _
                    acLnWt211, acLnWt211, acLnWt211, acLnWt211, acLnWt211, _
                    acLnWt211, acLnWt211, acLnWt211, acLnWt211, acLnWt211, _
                    acLnWt211, acLnWt211, acLnWt211, acLnWt211, acLnWt211, _
                    acLnWt211, acLnWt211)
    oLyr.Lineweight = eDwgLWs(oMSlvl.ElementLineWeight)
Next
'## Close the DGN file
oMSdf.Close
'## Quit Microstation application
oMS.Quit
ThisDrawing.Utility.Prompt vbCrLf & "Layer settings were imported from Microstation." & vbCrLf
Set oCol = Nothing
Set oLyr = Nothing
Set oMSlvl = Nothing
Set oMSlvls = Nothing
Set oMSct = Nothing
Set oMSdf = Nothing
Set oMS = Nothing
End Sub
Tuesday, September 16, 2008
Lvl2Lyr - A Utility to Translate DGN levels to AutoCAD layers using AutoCAD VBA
Since Autodesk and Bentley have announced an agreement to expand interoperability between their applications, I thought it would be nice to have a look into the microstation API through AutoCAD VBA. I learnt a thing or two about Microstation VBA by doing the following utility. This programs imports Level structure from a DGN file to the current drawing converting it to an equivalent layer structure. For this program to work properly, you need to include reference to 'Bentley Microstation DGN 8.0 Object Library' inside VBA IDE. The utility was tested using AutoCAD 2008 and Microstation V8.

Tuesday, September 9, 2008
Advanced Drag & Drop Operations - Link to a Specific Excel Cell or Range
Have you ever tried linking an AutoCAD object to a specific cell or row? For example, you might want to link a door block with a specific row inside the door schedule. Follow the easy steps to accomplish the task.
- Keep the Excel file and the drawing open.
- Select the required cell by clicking on it.
- Move the cursor towards the side of the cell until you see the move symbol (Similar to what you see inside the lens in zoom extents button icon).
- Now right click and drag the cell to the AutoCAD window.
- On releasing the right mouse button, you will be provided with a menu containing a menu item 'Create hyperlink here' as shown below.
 You can modify the above link to select a range of cells instead of a single cell.Press Ctrl+K and select the previous AutoCAD entity to open 'Edit Hyperlink' dialog box. At the end of the link, you will see something like file name.xls#sheet name!cell number. For example, suppose you are linking the C3 cell of Sheet1 of Test.xls placed in C: drive, then the link path will be C:\Test.xls#Sheet1!C3. In order to link a range of cells, you have to modify the above syntax to file name.xls#sheet name!cell number1:cell number2. ie, in the above example, it will become C:\Test.xls#Sheet1!C3:E6 to link a range of C3:E6.
Try to link a word paragraph using the above method and let me know how you achieved the desired result.
Advanced Drag & Drop Operations - Load / Run Scripts / LISP / VBA / ARX
Depending upon the type of files, there may be slight variations in the drag & drop result. Let's see how each file type responds.
Script: If you drag and drop a script file into the autocad window, it executes the script.
LISP: If you drag and drop a file containing LISP expressions but not a function definition, it straight away executes the LISP expressions. If the file consists of any LISP function definitions, it loads the functions into AutoCAD.
VBA: If you drag and drop a DVB file, it loads that project. The VBA module files (BAS extension) doesn't support drag and drop loading.
ARX: Loads the specific ARX application.
You can also use the drag and drop method to load other customization files like CUI, MNS etc.
Script: If you drag and drop a script file into the autocad window, it executes the script.
LISP: If you drag and drop a file containing LISP expressions but not a function definition, it straight away executes the LISP expressions. If the file consists of any LISP function definitions, it loads the functions into AutoCAD.
VBA: If you drag and drop a DVB file, it loads that project. The VBA module files (BAS extension) doesn't support drag and drop loading.
ARX: Loads the specific ARX application.
You can also use the drag and drop method to load other customization files like CUI, MNS etc.
Thursday, September 4, 2008
Advanced Drag & Drop Operations - Insert & Link Raster Images
Do you know the easiest way to attach an image? It's a simple drag (left click) and drop from windows explorer to AutoCAD drawing. Let's see how to link a an external image to an attached image. For example, you might want to link an overall plot plan image to a plot plan . For that, right click and drag the destination image to the drawing. When you drop it there, you will find a menu with 'Create hyperlink here' as shown below.
 Click on that and select the attached image when prompted for selection. To test the link, hold down the Ctrl key and click on the image.
 Click on that and select the attached image when prompted for selection. To test the link, hold down the Ctrl key and click on the image.
Advanced Drag & Drop Operations - Copy Text from a Web Page / MS Outlook / Text File
This time we will see how to copy text from a web page, Outlook and a text file.
To copy text from a text file
To copy text from a text file, left click the text file from explorer window, then drag and drop it to the host drawing.
To copy text from web page or outlook
Open the web page or email, then highlight required portion of text then drag and drop it into AutoCAD window.
In both the cases, it will be copied as MText.
To copy text from a text file
To copy text from a text file, left click the text file from explorer window, then drag and drop it to the host drawing.
To copy text from web page or outlook
Open the web page or email, then highlight required portion of text then drag and drop it into AutoCAD window.
In both the cases, it will be copied as MText.
Advanced Drag & Drop Operations - Attach a Drawing as an External Reference
As a continuation of previously posted drag & drop operations (Move Text Inside Edit Text Dialog and Move Text Inside Edit Attributes Dialog), we are going to look into some more intersting ones. You already know that dragging a DWG file into empty AutoCAD application window opens that file over there and in case any drawings are already open there,it inserts the dragged drawing as a block. Apart from this, if you need to attach the drawing file as an external reference, follow the steps given below.
- Locate the drawing file to be attached inside explorer window.
- Right click and drag the file into the host drawing already opened in AutoCAD.
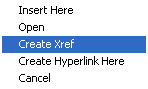
- When you leave the right mouse button, you will see a menu as shown below. Choose 'Create Xref' from the menu.

That's it. Now you have the dragged drawing attached as an external reference. We will see more drag & drop operations in the next posts.
Wednesday, August 27, 2008
AutoClock - An AutoCAD Digital cum Analog Clock Using AutoCAD Script and DIESEL
Here is an AutoCAD digital cum (partially) analog clock developed using a combination of AutoCAD Script and DIESEL. It shows current time in digital format updated as in a normal digital clock plus date and month along with a rotating seconds needle. I hope this program will help us to learn how to combine DIESEL and script effectively to acheive powerful results. The macro and script are pretty simple as illustrated below.
^C^C_Setvar;fielddisplay;0;_Undo;;;control;none;
_Select;\_Change;previous;;0,0;0;
_Rotate;previous;;0,0;$M=$(-,0,$(*,$(edtime,$(getvar,date),SS),6));
_Script;AutoClock.scr
Let us have a look at the macro in detail.
- _Setvar;fielddisplay;0;
Sets field display for the digital elements. - _Undo;;;control;none;
Disables Undo action. If the Undo is on, it will consume a lot of memory in a long run resulting in application instability. - _Select;\_Change;previous;;0,0;0;
Resets the seconds needle to the default position (towards 12). - _Rotate;previous;;0,0;$M=$(-,0,$(*,$(edtime,$(getvar,date),SS),6));
Moves the seconds needle to the current seconds position. - _Script;AutoClock.scr
Runs the script to update the clock at an interal of 1 second.
Arrange the above macro in a button and place the following script inside a text file named 'AutoClock.scr' and keep it somewhere inside the AutoCAD search path (for example, inside AutoCAD support directory).
_Rotate
previous
0,0
-6
delay 1000
Regen
rscript
If you want to try AutoClock, then download the required files and follow the instructions inside the readme file. To activate the clock, run the above macro and select the seconds needle when select objects prompt is displayed. The seconds needle accuracy may vary depending upon the command execution time. You can fine tune the clock accuracy by adjusting the delay. A delay just above 900 in place of 1000 works fine for me.
Subscribe to:
Posts (Atom)


